Thursday, December 30, 2010

Treasured blog wins and gifts from my new friends in 2010

 
Hello, friends! I hope you are enjoying this time of year. I've been reflecting on my experience so far in blog land.  It never ceases to amaze me how generous everyone is here.  Whether it is constantly sharing your creative spirit or leaving encouraging comments, the support and friendship that I have experienced has been overwhelming at times.  THANK YOU!  I also have enjoyed the playful aspect of blogging, including the giveaways. I need to share some very talented ladies with you that I was so blessed to have won original pieces of art from this year.  First up - Cindy at Lilly's Lace who created this incredible altered belt buckle above in honor of Breast Cancer Awareness month in October.
Is this not the most gorgeous piece of art?  It is hanging in my little studio to remind me about my self exams and to pray for those in treatment.  I hope you will visit Lilly's blog and tell her that I sent you. She is very talented and shares the best vintage wedding photos with poems. She's very witty! Thank you Cindy for sharing a piece of yourself with us all this year and for honoring this important cause. I love the belt buckle and all the goodies you included in my giveaway.
Next up is Marilyn at Willow and Figs.  I won this gorgeous altered journal in one of her Tuesday Treasure Giveaways!  Included in the giveaway were some of Marilyn's signature handmade cards like this one which is my favorite!
You are in luck too! Marilyn has two Etsy shops! One is for her artwork Marander Studios.  I found this lovely mixed media French wall hanging and purse there -

She has also opened another Etsy shop for her handmade cards.  That one is "on vacation" at the moment. I'm sure if you follow Willow and Figs, she'll let you know when she's open for business again after the holidays.
This beautiful crystal bracelet arrived with a Christmas card from my friend Cindy at Cindy Adkins Whimsical Musings.  There are not too many days that go by that I don't chat briefly with Cindy or check her blog. She is constantly creating for her  Etsy shop and inspiring us all by sharing her work on her blog.  Here are a few favorite items that are available right now in her shop too!


Aren't these gorgeous? I know many of my followers already know Cindy. She just recently added this inspiration kit above to her shop.  Many of us have been busy over the holidays. I wanted to make sure you saw this treasure trove of goodies!

Thank you to all three of these talented ladies. This is long overdue!  I hope you don't mind that I used pictures from your blogs and shops today! I admire each of you and thank you for sharing your talents with us.  I hope all my blog friends have a safe holiday weekend and wish you many blessings in the new year! Linking this post to White Wednesday this week.
Tuesday, December 28, 2010

A studio for Christmas!

I'm very excited to tell you that my husband is going to let me convert our formal living room, which is only ever used to display our Christmas tree, into my new studio!  For Christmas I received the craft table and two wall shelves above to get me started! I am thrilled. My girlfriend has been storing it in her garage for me. I can't wait to have a desk high enough to stand when crafting. I also love that it is high enough to keep the Basset Hounds away from important projects and supplies. Here's a shot of where I plan on putting it (try to ignore the fact that it is in a state of Christmas chaos)...
 The room is very similar to the display room above. I plan on putting the table in the center of the room and wall shelves on the left.  On the right wall, I'm looking for a vintage dresser to redo. I think that will be great for storage.  I have plenty of garage sale and thrifty finds to use for decorating. I also have some fun ideas for the wall but I'm keeping that a secret for now. The french doors are definitely in need of some drapes. The ceiling is 12 feet in this room. I need something to soften the walls. There are plans for more lighting too.  I'll be busy. I can't wait to get the tree down and get started!  Of course, I'll keep you posted along the way.  Still have family and friends in and out this week, but I wanted to get a quick post up and say hello. I hope you had a blessed holiday and are looking forward to the New Year!

Friday, December 24, 2010

Warm Christmas Wishes!

As you gather with friends and family, I hope that each of your hearts are filled with the Christmas spirit.  I want you to know that I count each of you as a blessing in my life.  I am so grateful for your friendship and the way you inspire me daily.  May God bless you and your families this Christmas season and always.  Hugs!  I'll be back soon...

Tuesday, December 21, 2010

Broken china project

 
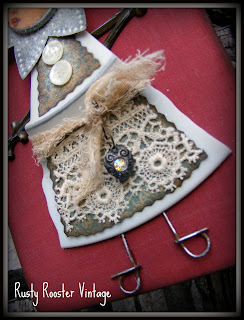
This is not a new project for me. I started making these little angels last year from broken china plates. Can you see that her "dress" is made from a plate?  My friend Sarah at Quality handcut mosaic tiles by Judy Snow on Etsy helps with the cutting and provides the dresses.  She was very sweet to respond to my custom order last year and immediately understood my vision. I just came across three of the cut outs today while organizing my studio supplies! I'm feeling inspired again!
 
The angels are altered using scrapbook paper, lace, vintage hardware...whatever I have on hand. I then mount the finished angel on a book cover and hang with lace or chain.
I love using found objects for their halos and wings.  So far I've only used wire for their legs but have considered skeleton keys. 
If you have followed my blog for a few months, you may remember this post.  I made a little fairy too from broken or cut china.  My daughter's love of fairies inspired me.
This is a fun project and great way to use your smalls that you have collected.  I'm going to display my angels with some of my Christmas decorations and link this post up to White Wednesday at Faded Charm.  Have a safe week everyone as you rush around finishing up holiday shopping and such.  Thank you so much for taking time out of your busy day to stop by here! I love your comments and appreciate your follows.

Monday, December 20, 2010

Christmas Tree Do-over and Feature at The Graphics Fairy!

We had to replace our live Christmas tree yesterday! The original tree dried up very quickly and turned brown.  The darn thing never took on water. I think they forgot to cut the trunk before we took it home.  The good news...the tree lot replaced our tree for free.  There were very few trees left so I am still amazed we found this taller and more beautiful tree!
We did take a break from trimming the tree yesterday to attend a party at the construction site for the new church our congregation is building.  This was a really neat idea. I wanted to share it with my creative friends.  The 6-8 pieces of drywall will be used in the new parish life center that is under construction right now. There was also a concert and refreshments. What a nice afternoon.

When we got home it was back to the tree. I think we enjoyed the second trimming more than the first.  We lit a fire on the porch, opened a bottle of wine and got to it. Have I shown you the porch? I don't think I have this busy holiday season. Here it is at dusk yesterday. Forgive the poor photo in low light.
The table is a fire pit.  As you can see the french doors open right to the tree. It makes it very easy to work all the way around the tree when installing the lights and garland. Next year, I will be using the formal living room as my new studio! I'll reveal more about that in January. I wonder what the heck I'm going to do with the Christmas tree then?

So, I wanted to whine about having to redo the tree but honestly it was a great day with the family. We like the second tree more than the original.  I was probably a bit more relaxed about it since I knew I had today (Monday) off from my day job. I played hooky with my daughter and baked cookies all day with our friends! Fun, huh?  Guess what? It gets better.  I started my day today early by checking emails.  You can't imagine how surprised I was to have an email from Karen at The Graphics Fairy telling me my altered spoon project was going to be featured at Brag Monday!
 So, now I'm bragging to you about it! Thank you, Karen.  You constantly inspire me with your FREE images. I hope your week is going well and if anything has you down, I hope it turns out better than expected. Thank you for your comments and follows.  I do respond to every one but you must have your email set up in your profile.  Please be safe as you travel this week and rush around doing last minute things. Hugs!

Saturday, December 18, 2010

Southern Living Snowman - Project you can make today!

I'm sure you are all done with your shopping, Christmas cards, baking, holiday parties, decorating and now you need something to do, right?  lol  Well, I couldn't resist this ten minute project and had to share it with you.  It is very simple and made with supplies you might have on hand.  I spotted this grapevine snowman in a Southern Living magazine a few years back. I decided this year, I would make him.  You'll need:  24 in wreath, 18 in wreath, 12 in wreath, command strips, scarf, hat, ribbon and a flower. 
I simply picked a wall (inside or outside) where the largest wreath would fit. I really wanted visitors to see him as the entered the front door.  I started with the bottom wreath and estimated where to put a command strip hook (you know those temporary sticky hooks found at the drug store). I then hung it and added the second wreath making sure they touched. Did the same thing with the third.  Once the wreaths were in place, I did take them down and give the strips the hour they require to set.  I then assembled my snowman. I love this scarf.  It was in a dresser at my in-laws. When they downsized a few years ago, my mother-in-law gave me several of the kids (she had seven!) scarfs and hats to keep for fun. So glad that I did.
I found a foam hat we had purchased a Michael's for a school project in the craft room.  I cut it in half and used tacks to attach to the wall.  I did add a ribbon and flower first.  It's a little small but I love it.  The idea is to use what you have on hand and make this a quick project.
So, when visitors arrive this is the view from the front door now.  Thanks to the command strips (which the wreath hides so well) there will be no holes in the wall when he "melts" in the spring.  This would look great with evergreen wreaths too.  See what you have around the house! I'd love to put a broom up with him too!  Have a  great weekend. Wrap up all your loose ends. I'm off to run around some more, wrap gifts and attend a company Christmas party.  Thanks for stopping by! Linking up to Saturday Night Special at Funky Junk Interiors.  Come visit and see Donna's full home reveal of her "junk" Christmas.

Wednesday, December 15, 2010

Altered Salt and Pepper shaker snowmen

I recently discovered paper clay thanks to Dawn at The Feathered Nest.  She has the best tutorials. I purchased her paper clay bird tutorial and couldn't stop there! I've seen lots of paper clay snowmen in blog land. Tis the season, so I began thinking about making my own.  I had some vintage bottles and remembered seeing a project on line using those. I still wasn't feeling it though. Then while planning a craft night with my girlfriends, I found the perfect thing...vintage salt and pepper shakers. We made just the heads from styrofoam and paper clay.  The real fun came in mix and matching the salt and pepper shakers so we could each have our own snow couple.
I was really excited to try and use some of the metal tops for hats.  I loved how this one in particular looks like a pill box hat...a bit Jackie O for my snow gal.  My girlfriends each brought their stashes of vintage goodies. Before you knew it, someone had put a vintage earring on the "hat" and embellished her.  We were off and running!  The snow gal's body is made from vintage trim, tinsel and buttons.  Her purse is a newer charm that has been distressed and hangs on her twisted wire arms.
My handsome snow guy's hat is made from a large vintage button, wooden spool, vintage holly pin and another button on top. I gave him a red bow tie, three buttons and some tinsel to finish him off. He also has wire arms.
I really loved how these turned out. I painted mine and used fine glitter to finish. One of my girlfriends used Martha Stewart white tinsel glitter on her couple. It looks like snow! I love it. Mine has more of a folk art look. Hers looks like real snow.  I like them both!

I hope you enjoyed this project. Thank you for being the best followers and leaving such sweet comments. If you have your email set up, I enjoy responding back to each of you.  I'm linking to White Wednesday over at Faded Charm Cottage.  Come by to see everyone's projects and decorating.  Hugs!

Monday, December 13, 2010

Altered spoons and tins

 Hello there! I hope you had a good weekend. I was busy finishing up some last minute gifts for my girlfriends.  I altered a silver plated spoon and two small tins for a gift exchange. The Victorian Santa graphics came from Karen at The Graphics Fairy. I'm sure most of you know that her blog is a great source for FREE images.  I'm going to link this project up to her Brag Monday party. It is a great party to visit and see all the projects that other bloggers have made using her freebies.
The tart tins were altered into ornaments. The first thing to do is to make two small nail holes in your top. I do these right in the middle so the ornament will hang properly. I then used a thin gauge wire to create a loop and added some wooden beads and pearls. For the inside, I simply layered some cheesecloth, lace and the image then adhered to the bottom.  The image was covered in a gel medium. I then painted some Tacky Glue around the edges and dipped in glass glitter.
The silver spoon is my favorite. I love how ornate the serving spoon is all by itself. It's beautiful.  I did not convert the spoon in to an ornament. I knew my girlfriend would want to display it with one of her many, many vignettes around the kitchen and dining room or frame it. We've talked about altering or framing silver for this purpose in the past. So, it was fun to surprise her with this little piece. I added some crinkled ribbon and a vintage earring to the spoon along with the same layers of cheesecloth, lace and image. I made a frame this time out of the glass glitter. 
I hope you enjoyed my little project.  The best part is the serving spoon was .50 at a local antique store and look how it has been repurposed!  The tins were also .50 and from my trip to Renningers last month.  Have a great week! I have a few more projects to share with you. I've been playing with paper clay. More on that soon! Also linking to Between Naps on the Porch Vintage Inspiration Friday and Nifty Thrifty Tuesday! Stop by and see us!

Thursday, December 9, 2010

Pottery Barn wall cubby goes Xmas

This is where I put all those vintage smalls I've been hoarding collecting! I love this little PB wall cubby. It was meant for an office but ours hangs in the kitchen over a wine rack. This way I get to display and enjoy different vintage finds, kids projects, etc.  I've had a lot of fun with this since it was purchased this summer.  
It has 25 cubbies, so you could even make it an advent calendar (insert squeal here).  That is, of course, only if your (meaning mine) daughter is not extremely fond of the one you (that would be me) made several years ago out of a cookie sheet (yup, we all did) that is not so much your style anymore but she has deemed it a family heirloom.  lol  So, maybe next year it will be my advent calendar. I picture vintage bottles with numbers or little take out boxes with lace and vintage jewelry pieces...can you tell I've been thinking about this?  Maybe next year....Hey, do you see my vintage car horn at the top? She's in great shape and still HONKS really loud. I got her for $15 at a local antique store. I love it.  The vintage clipboard is a favorite too. I print different images on dictionary pages or sheet music, depending on the holiday. Double click to enlarge the photos.
There are so many of my favorite little treasures and hand made items in here. I have some older pics of the kids on Santa's lap, vintage Christmas Avon bottles, vintage ornaments, tags sitting in flower frogs and some small assemblages like this little elf on a spool from my friend Kim's Etsy store Birdseye View.  I have a few of my vintage recipe cards in here too.
I hope you enjoyed your visit today. It was so nice to have you stop by. I love your comments and appreciate your follows.  Stop by these great parties! I'm linking up! -