Showing posts with label Arts and Crafts. Show all posts

Sunday, December 23, 2012

Simple gift wraps!


Hello there!  I thought I would share a couple of quick wrap ideas with you. If you find yourself in a jam, this is a favorite of mine.  Simply take brown bags, don't unfold or open, sew down three sides leaving the top open.  You have an instant envelope.  Fold the top over and then punch two holes next to each other for a ribbon to be inserted and bow tied. Not my original idea but I certainly have used the heck out of it!
I ripped a page from an old book and found some embellishments that I've had for years in the scrapbook closet.  I could have easily stamped on another piece of paper or fabric and added that instead. Here's a good rule of thumb...layer your projects in odd numbers.  Paper, one white snow flake and one silver snowflake...three layers on any project gives you depth and interest. Even on one this simple!
Thank you Pinterest for the idea to make the craft beer into a reindeer! lol  This is one of Rudolph's lesser known cousins, Leroy. He was also discriminated against years ago for his unusual nose but didn't seem to get the publicity his super high flying cousin did!
And a quick shipping tag. Sometimes it is fun to NOT put "To and From."  Try using a picture of you or something obvious like this basset hound stamp.  Trust me...our friends knew it was us that left this at the door, rang the bell and ran. p.s - try to ignore the missing front feet on the dog.  I never said I was perfect! lol

Hope you are preparing for Him and all the visitors headed your way this joyful holiday.  See you soon!

Sunday, December 2, 2012

Ornaments from trash and scraps

I found an old metal strap (probably from a can of motor oil or oil filter) in the parking lot where we bought our Xmas tree.  My husband and kids are used to me picking up old metal and discarded wood. Please tell me I'm not the only one that does this!
Over the weekend I spent an hour or so with a glass of wine getting messy in the studio and used my new find. I made an Xmas tree from pieces of the strap on this small canvas.  Kara and I both made tree ornaments on canvas. The fun part is preparing the background. We covered the canvas in book pages and then used a brayer to paint on white, gold and blue onto the backgrounds. You could always use a damp towel, your finger or a dry brush to do the same. We also used distress ink and glitter. Would you like to see hers?
Her background came out even better than mine! She used some ribbon scraps to make her tree. I plan to use an eye hook to hang them both.  I displayed mine on a cabinet card project I'm working on right now.  Just looked so pretty together that I had to photograph it that way.

Hope you have a wonderful week!  I'm looking forward to sharing a new find, my bedroom redo and some dried flower projects with you soon.  xoxo Linking to:

:vif187


Sunday, July 8, 2012

Party at Becky's Part Deux

Remember Becky's fantastic party from my last post? Well, let me introduce you to the talented ladies that I shared the day with at Becky's. From left to right starting top row (photo courtesy of Cassandra below):

Me
Becky - Let's keep encouraging her to start a blog!
Carol -Another fun and crafty gal but no blog yet

At each of our place settings, Becky had a bag chock full of goodies to play with during our "crafternoon."  She also shared so many supplies with us.  She is such a gracious and generous hostess! The idea is to make a little something while we are sipping cocktails and having delicious hor d'oeuvres.  It doesn't get any better.
 There were so many beautiful things that I had a hard time deciding where to begin and what to craft. I decided to alter a cone or tussie mussie using my bag of tricks.  Here are a few shots of our creations. I didn't manage to get them all. Sorry girls!

I want to be sure to thank the vendors and artists that Becky's shops and uses on a regular basis to style her wonderful parties, her home and her creations. Many of the goodies in our bags came from these wonderful artists/shops.  Be sure to visit-
Freckled Laundry
A Little Bit French

Now let me introduce you to my new favorite word - "Craftermath"
Could not be any more true!  I need to frame this and hang it in my studio.  If you read this blog, I know you can relate.  Thank you so much for stopping by.  I appreciate your visits and comments so much.  More to share soon...until then xoxo

Wednesday, March 28, 2012

Fun Easter Egg project from Scarlett Clay

My friend Scarlett posted these adorable eggs this week and was kind enough to give me permission to link up and steal a few of her photos.  I knew you would love it!  Her inspiration was Martha Stewart. She posted the project about five years ago on her site.  Aren't they adorable? 
You can find these little wooden eggs in your local craft store.  They are very inexpensive and fun to paint or decoupage. Scarlett covered these in her husband's former stamp collection.  How fun!

You can see the entire post here.  What a fun and easy project to do for Easter. Thank you, Scarlett!  Lately I've seen eggs painted, jeweled, covered in lace and all kinds of paper. I really love the postage stamps though. I think an old children's book would be fun to use too.  Enjoy!  Be back soon.  Hope all is well.  xoxo


Sunday, March 18, 2012

Vintage images to share

I discovered some old receipts in a book I picked up at a rummage sale. What a treat! For a girl like me, this can feel a bit like winning the lottery.  This is an old electric bill. I love how it says for your convenience you can come down to the office to pay your bill...so convenient.  lol
Here's the front.  I do love envelopes and have quite a collection.  I just need to find a way to use them in my artwork. I think it is time for a glue book or some collage work. 

This one is a tag from a gun store.  Not full of sugar and spice and everything nice but it certainly is a beautiful color and it would work well in a more masculine piece.  Thought I would share.
Here's another vintage image...a friendship that is nearly 20 years old.  Meet my friend Vicki. We were roommates for years and formerly know as "The Vickis."  She surprised me with a spontaneous visit, and you can blame her for my lack of productivity in the studio this week!  I enjoyed every minute though. She was such a trooper tagging along to three different basketball games, volleyball practice and even helped me host a team party at the house.  I can't wait to visit you in wine country soon, Vic.  Safe trip home.

As for you my friends, I have some fun things to share this week so stay tuned! Hope all is well. xoxo

Sunday, March 4, 2012

New project to share

Well I finished the book page matte or frame from my previous post here.  I used it in my latest project.  I found this vintage holy card and roof tin on my shopping trip to Deland. The reds in the card were a perfect match for the painted tin.
I plan to display this on an easel in the house .  I'll show you that vignette soon. The book page matte turned out well and makes a nice background for the holy card. I like the texture it creates and paper on paper made it easy to assemble. 
The top is finished with some scrap fabric and a vintage earring. I felt it needed a bit more too so I wrapped two twigs in twine. I like how it brings a little nature into the piece. There are trees in the background too of the holy card  illustration. I thought it worked. 

The pearls at the bottom are hand sewn on to a scrap piece of lace. I really like working with found objects, scraps and contrasting textures.

Thanks for visiting!  I can't believe I have rolled over 1000 followers. Look for a giveaway very soon sweet friends. I appreciate your support, follows and comments so much! See my previous post for a quick tutorial on how I made the torn vintage book paper "frame" or matte.  Hope you are having a great weekend.  xoxo

Wednesday, February 15, 2012

Fun packaging to share!

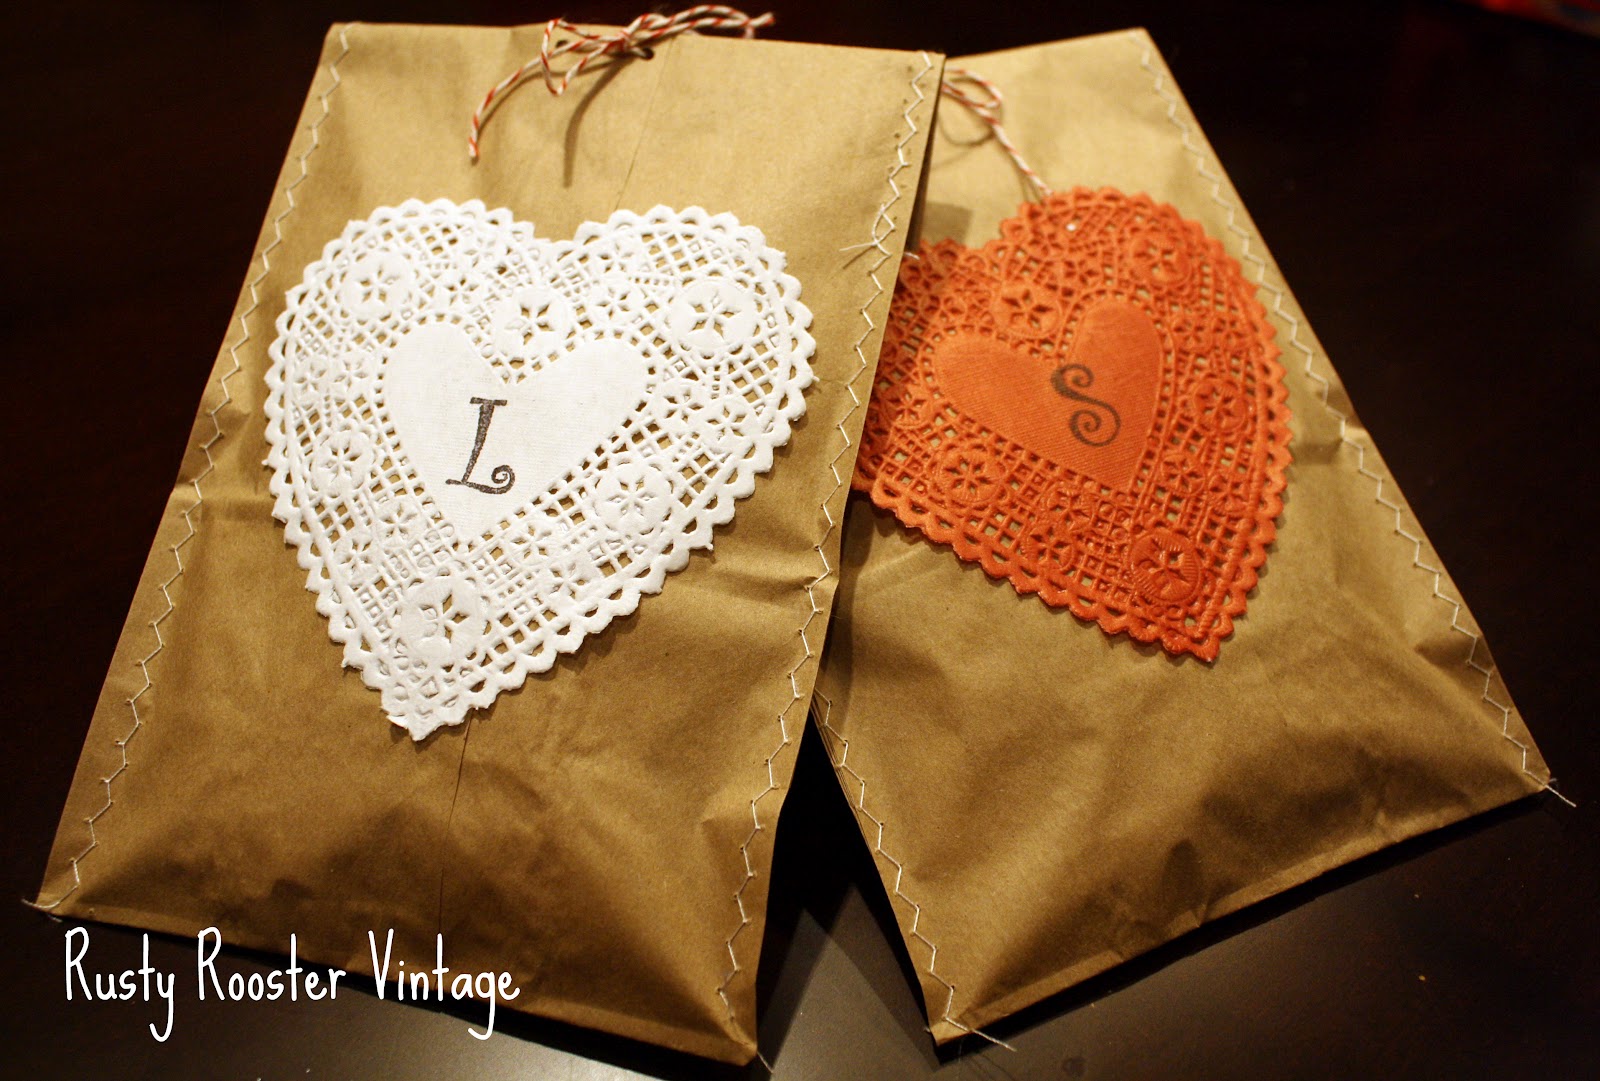
I mailed the winners of my Valentine giveaway their packages this week. I had some fun using brown paper bags in the packaging and wanted to share the technique with you.  It is so easy!  
Simply leave the paper bag folded at the bottom and sew up each side. I chose to use a fancy stitch! Leave the top open.  Fold the top and punch two small holes about an inch apart.  The package can now be closed with bakers twine or ribbon. Voila!  Isn't this cute?

I added a paper lace heart with a stamped monogram on each.  Although I have seen similar packaging on Pinterest, I got this great idea from a local vendor that sells here in Oviedo. The always have creative packaging.  You can visit Ragtag Rubies here.  They have really fun recycled goodies. Kara loves their jewelry.  Thanks for visiting!

Monday, February 13, 2012

A beautiful Etsy purchase

Hello, friends.  I wanted to share a beautiful Etsy purchase with you and introduce you to a blogging friend of mine, Scarlett Clay
Scarlett is a talented artist who's work inspires me so much.  She works with many different mediums and shares projects and challenges that we can all enjoy.  I hope you will visit her and tell her I sent you over!
I'm also inspired by Scarlett's devotion to her beautiful family.  Scarlett's youngest son, Knox, has Cockayne Syndrome. This illness causes children to age prematurely and sadly it shortens their life expectancy.  Scarlett keeps us posted on Knox on her art blog and often creates pieces that are inspired by her journey as she tries very hard to process her son's diagnosis.
Scarlett has an Etsy shop too. All the proceeds go to Cockayne Syndrome research.  You can visit it here.   I purchased these beautiful butterfly cards there. I love all the colorful scrapbook papers mixed with book pages, transparencies and three dimensional elements.
Have I ever mentioned that I have a thing for butterflies? I do. They are so delicate and beautiful. Thanks for visiting today.  Please pop over and visit Scarlett's lovely blog.  I know you will enjoy it!  I'll be back with picks from a recent trip to Deland, Florida and some fun packaging to share.  xoxo
 

Thursday, February 9, 2012

Some of our Valentines

Hello, friends! I wanted to share a few of the valentines we have displayed around the house.  Kara found this little vintage valentine above in a book we purchased at a church rummage sale. Don't you love surprises like that?  Don't you love that holder even more?  If so, visit my friend Petite Michelle Louise.
My friend, Kim, made this adorable tag in a bag for me for Valentines Day. I love how she used the vintage playing card to make this and love the rooster even more!
Here's a valentine I made last year for a few friends. Had to keep one for myself! I love to layer lace and paper, give it a quick sew and voila! That crumpled seam binding is a favorite. I'm almost out and cant' remember where I got it!
This one is a favorite since I made these with Kara's help.  She did a great job last year helping me design this one. We made a few. Some were more heavily distressed, which she loves!
Aren't these adorable?  My friend Kelley made these for me. I love the papers she chooses for her projects. I think I have a set of blocks for nearly every holiday from Kelley. 
Here's a blast from the past!  We have a local specialty scrapbook store. I love to shop there. They do "make and takes" sometimes. This one is probably 4-5 years old.  We made our basic page and then, of course, came home and added all kinds of fun details.  I love to break this out on Valentines Day and put it in my altered clipboard by the front door.  The little strips of paper have notes to my husband letting him know the things I love about him. 

I hope everyone is having a great week.  I'm hoping to do a little shopping this weekend at a new antique store in town. I'll be sure to take you along.  Thanks for visiting! xoxo
Related Posts Plugin for WordPress, Blogger...