I finished one of my nests on a spool. I've decided to mail this one as a surprise to a sweet friend. I kept it simple. I did not want to take away from the beauty and texture of the nest. I wrapped a bit of paper around the spool then added some waxy flax and a vintage button. Here's a close up of the nest on this one -
If you missed my post on how to make these, go here. It is a fun project and you probably already have the materials to make these.
I embellished a store bought card (love the Michael's $1 section for this) for her too. I love to add a personal touch to these pre-made cards. You could also use your own scrap cardstock to make cards. Pull out your bits of lace and paper, do a little stitching or just use glue, maybe even add a rubber stamp image...add your special touch. I could spend hours making these. Sometimes I do! It is great to have a stash on hand. The extra touches on these make them so much more fun to give.
I hope everyone has a safe Memorial Day weekend. We are staying close to home, and I plan to do a little creating. What about you? Any big plans? Linking up to:
Thursday, May 26, 2011
Nest for a friend
Labels:
altered,
Arts and Crafts,
birds nest,
gifts,
Nests,
spool,
Tutorials
Tuesday, May 24, 2011
White Wednesday Reflection
At the funeral of a friend and mentor many years ago, the pastor said, "When you see the sun rays piercing through the clouds, that is Maggie. She's speaking to you. Reminding you to live each day to the fullest and hold those dearest to you as close as possible." My kids often point out clouds and sun rays as we are driving. It makes me smile that they remember the story I told them of a young mother and co-worker that died too young and what a pastor told a grieving congregation of her friends and family. Maggie, thank you for the beautiful reminder on Saturday when we were at the beach. It is always bittersweet to see such beauty in the sky. The kids spotted you before I did. xoxo
Labels:
bird,
clouds,
photography,
reflection,
White Wednesday
Sunday, May 22, 2011
Housewarming gifts
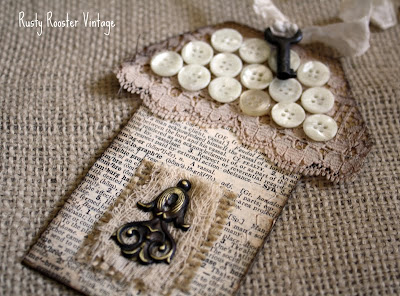
We visited my brother in law at his new place this weekend. We brought along a nice bottle of wine and yummy pie. I made a quick house tag and tied it on to the bottle with crinkled seam binding.
Kara helped bake the Triple Berry Pie. It was delicious! I'll share the recipe with you below. This is so easy!
Triple Berry Pie
1c strawberries 2/3 c. sugar
2 c raspberries 1/4 c. cornstarch
1 1/2 c blueberries 1 tsp lemon juice
9 inch double crust pie pastry
Clean the berries and let dry on towels. Mix sugar and cornstarch together. Gently toss berries with the mixture until well coated. Line a 9 inch pie plate with half of pastry. Transfer berry mixture to this crust lined pie plate. Top with second crust, and seal and crimp the edges. I brushed an egg wash (egg whites and bit of water) on top of crust and sprinkled with sugar before baking. I always "flute" (is that the right word ladies) the crust with a few small slits. This pie will bake for 45 minutes. To prevent crust from overbrowning, cover edges with foil for first 25 minutes of baking then remove for remaining 20 minutes. Add cool whip or vanilla ice cream to serve! Enjoy. Have a great week my friends.
Labels:
Arts and Crafts,
berries,
buttons,
house,
housewarming,
lace,
paper,
pie,
recipe,
seam binding
Wednesday, May 18, 2011
Blogger lunch at Sweet Peas
Hello! I had the pleasure of getting together for lunch with some Central Florida bloggers this week. What a treat to spend a few hours with like minded souls. In this photo starting at the top left - Me, Kathy (blog stalker, thrifter, booth owner) and Carol of The Polka Dot Closet. Now bottom left, Shelley of Sweet Pea Home, Karen Sue of Sue Bee and Butterflies and Susie of From my home to yours. Behind the camera on this shot (BIG THANK YOU) is Sylvia of My Trinkets.
We got together at Shelley's for lunch and good conversation. These gals are bloggers, junkers, artists, trend setters, collectors and decorators. What is there not to like? Shelley was kind enough to host us at her home this time. As I mentioned before, Shelley's gorgeous home has been featured in professional photo shoots. She has a self described style that is French farmhouse with a bit of industrial and shabby. I think we all agreed that you could just spend hours studying her vignettes. Shelley didn't mind if we did just that. Thank you for being such a gracious hostess. You were so kind to let us all wander about your home with our cameras snapping photos!
Have you thought about organizing a lunch or happy hour for your local bloggers? We plan to do this again soon. I've offered to host the next one. Everyone can bring their cameras and take pictures of my kids art on the fridge, my folded laundry on the washer and two basset hounds sprawled out on the couch taking up all the seating! lol I certainly enjoyed seeing Shelley's lovely home but meeting these gals was the best part. xoxo I hope you will take a minute and visit each of their links . They really do inspire me, and I truly enjoy reading each of their blogs. I know you will too. Hope you are having a great week! Linking this post to-
Labels:
bloggers luncheon,
junk,
our town,
Sweet Pea,
vintage
Salvaged window and wood = Beautiful!
This little beauty is a birthday present for a dear friend. I snapped a few pictures so that I could share it with you. Isn't she gorgeous? It is made from salvaged parts - window, old wood and legs are part of an old ladder. I love the peeling wall paper.
Happy Birthday, Kelley! I'm so glad you like her. I had a great lunch yesterday with some local blog friends. Can't wait to share a few pictures with you in my next post. I hope everyone is having a great week! Until then...xoxo.
Monday, May 16, 2011
Thank you Laura at 52 Flea!
I was so happy to have won Laura's giveaway at 52 Flea. As the lucky winner, I was able to create an 8 x 10 custom canvas from Easy Canvas Prints. It was very easy to use their website and the canvas arrived within a few days. I selected this older photo of Kara and Shelby that I just adore. The canvas looks crisp and clean. I actually took it outside to photograph so you could see the texture. Hanging on the wall, it looks like it was printed on photo paper. I really like the look.
I chose a wrap around design. The picture actually wraps around the edges of the canvas. It looks great hanging on a gallery wall I have in the kids play room. I'm hoping to snap a picture of my son, Jack, with our other Basset, Zoey, to add to the grouping. I feel a photo shoot coming on!
One last thing...I am VERY excited to be attending a bloggers luncheon tomorrow here in Orlando. Super home stylist, Shelley, of none other than Sweet Pea Home has offered to host it at her lovely house. I've met Shelley a few times recently at sales and we chat via email from time to time. I am really looking forward though to chatting with her and the other blog friends over lunch. Shelley has also given us the blessing to bring our cameras. You see Shelley's home is AMAZING. As in Fifi O'Neill amazing... Check out the Italian design magazine article that Shelley's home was featured in after Fifi discovered it - click here! I'm sure I'll have a few pics to share too of my favorite rooms and vignettes. I'm also looking forward to introducing you to a few local bloggers you may not know yet. Until then...xoxo!
Sunday, May 15, 2011
Very special rooster gift!
A HUGE thank you to Jan at Punch Drunk Needleworks for making this adorable yarn hook pillow for Kara. Jan spotted this painting Kara did on canvas for me a few months ago. I had blogged about how much I loved it...
She contacted me and asked about using the image in a piece of her artwork. I said sure! Then, she kept in touch while she was making it. She decided to do a yarn hook to practice for some rug hooking she planned to do with wool. Take a look at the work in progress from Jan's blog...
The best part is when she was done, she made it into a pillow. Isn't she so sweet!? Kara loves it. She won't let the Bassets near it! lol Take a look at this lovely piece from Jan's blog -
There are so many art forms out there. I realize the mediums I like to play with just scratch the surface. I love meeting anyone that enjoys getting their hands into a project. It has been a pleasure, Jan. Thank you so much for this little treasure.
Monday, May 9, 2011
Tutorial - Making bird's nests
Some of my best days creating are the ones I didn't plan. No project idea in my head that I'm painstakingly trying to recreate on the project table with what I have on hand. No expectations or deadlines. It is all about being spontaneous. Something just inspires me, and I sit down and start creating. Last week, Kara (my daughter) and Sydney (her BFF) were making birds out of clay at the dining room table. I sat down to check things out. I decided the birds needed a nest, so I began to play too....
I had some wooden spools on hand. They seemed the perfect size and proportion for the birds being made. They would make great little stands for my nests and bring in the wooden element of a tree. Next, I grabbed some 30 gauge floral wire. I wanted to be able to bend and mold the nest as I was constructing it. Anything similar will work. I actually wrapped it around two of my fingers. I started with a tight wrap and released the tension each time I wrapped around to get the bowl shape you see here. I added a heavy dollop of EX6000 (EDIT: This is a craft glue found at Michael's. Holds heavy embellishments and great for metal) to the top of my spool and placed the nest on top, holding it a minute or so until it set. Time to pull out your floral moss and grass.
I started by adding EX6000 again to the center of the nest on the spool. I then placed a clump of green grass to the top center and held it until set. I then added glue directly to the spool again but this time around the top edges. I added small bits of green grass here to the outside edges to help cover the wire. Now, don't worry about all the excess. You will trim that later. Be sure not to trim it perfectly. For a realistic nest, leave long pieces here and there. Create texture with different lengths.
Adding some moss will really make your nest realistic! I added EX6000 all around the outside edges of the nest (wire) this time and added clumps of green moss. I also added moss in the center of the nest. I used my fingers to mold the shape. Again, I trimmed the edges at different lengths to create texture.
Now we just need to finish our birds and welcome them home! I plan to dress up the spools a bit too. This is a work in progress. I wanted to share the nest tutorial though. It was so easy to do and can be recreated on a much larger scale. How about you? What is on your project table this week? Have you taken any time to play lately? Tell us about it. Until next time...xoxo
Thursday, May 5, 2011
Gifts from friends
Hello everyone! I had a little birthday last month and my dear, sweet, vintage loving, mixed media art making friends Jodi, Kelley and Kim (girls I put you in ABC order...lol) each gave me something special to mark the day. These girls really know me. Whether it is sharing a special find or making a handmade treasure, it makes me feel like a kid again when we exchange gifts. This adorable tag above was made by Kim. With it was this little cutie-
I had seen this on Etsy. Kim hijacked my favorites and found it. Thanks, Kim! I love it and looks great in the kitchen.
This beauty came from Kelley. Kelley and I have a mutual blog friend, Petite Michelle Louise. We both love Michelle's blog and her fantastic Etsy shop! One of my favorite finds in the shop would be Michelle's altered door knobs. Kelley got me one! Isn't this perfection?!
How about these two darling gifts? They are from Jodi and her daughter Sydney (Kara's BFF). I can't stand how cute this little bucket is on my back porch. This hen pin cushion was a real surprise. Sydney also got me a gift. Makes my heart melt that she found this and thought of me.
I had another sweet surprise in the mail. I fun filled package of little paper pieces, hat pins and organza bags from sweet June at Lina Beas. June, I have already used half the envelope for teacher appreciation week! I dug in right away. THANK YOU! Guess what? June has a giveaway here if you'd like to stop by and enter. Take a look -
Life is better with friends at your side. So glad to call these girls and each of you who visit, my friends. Hope you are having a great week and a safe weekend. Thanks so much for stopping by!
Subscribe to:
Posts (Atom)