


Photo: Pottery Barn
Curse you Pottery Barn for having such cute stuff! The most recent PB catalogs are just filled with vintage flair and found object style. Now, my family has committed to a homemade tree these past few years. The days of Mom having a tree out of the latest magazine or style book are gone. We embrace all the kids handmade ornaments and even proudly display my husband's fourth grade self portrait on a pickle jar lid. Every year, I also make ornaments too based on the latest trends or my vintage finds. So, I was The set of four ornaments sells for $29.00. I set out to make something similar for under $10.00 and share the process with you along the way! So, here is the ornament I focused on -

Here's my supply list:
Clear plastic ornament from hobby store $1
Sheet music
3 in scallop or circle punch
Glue, spray adhesive, scissors, fine glitter
Christmas, bird die cuts
Cheesecloth or ribbon
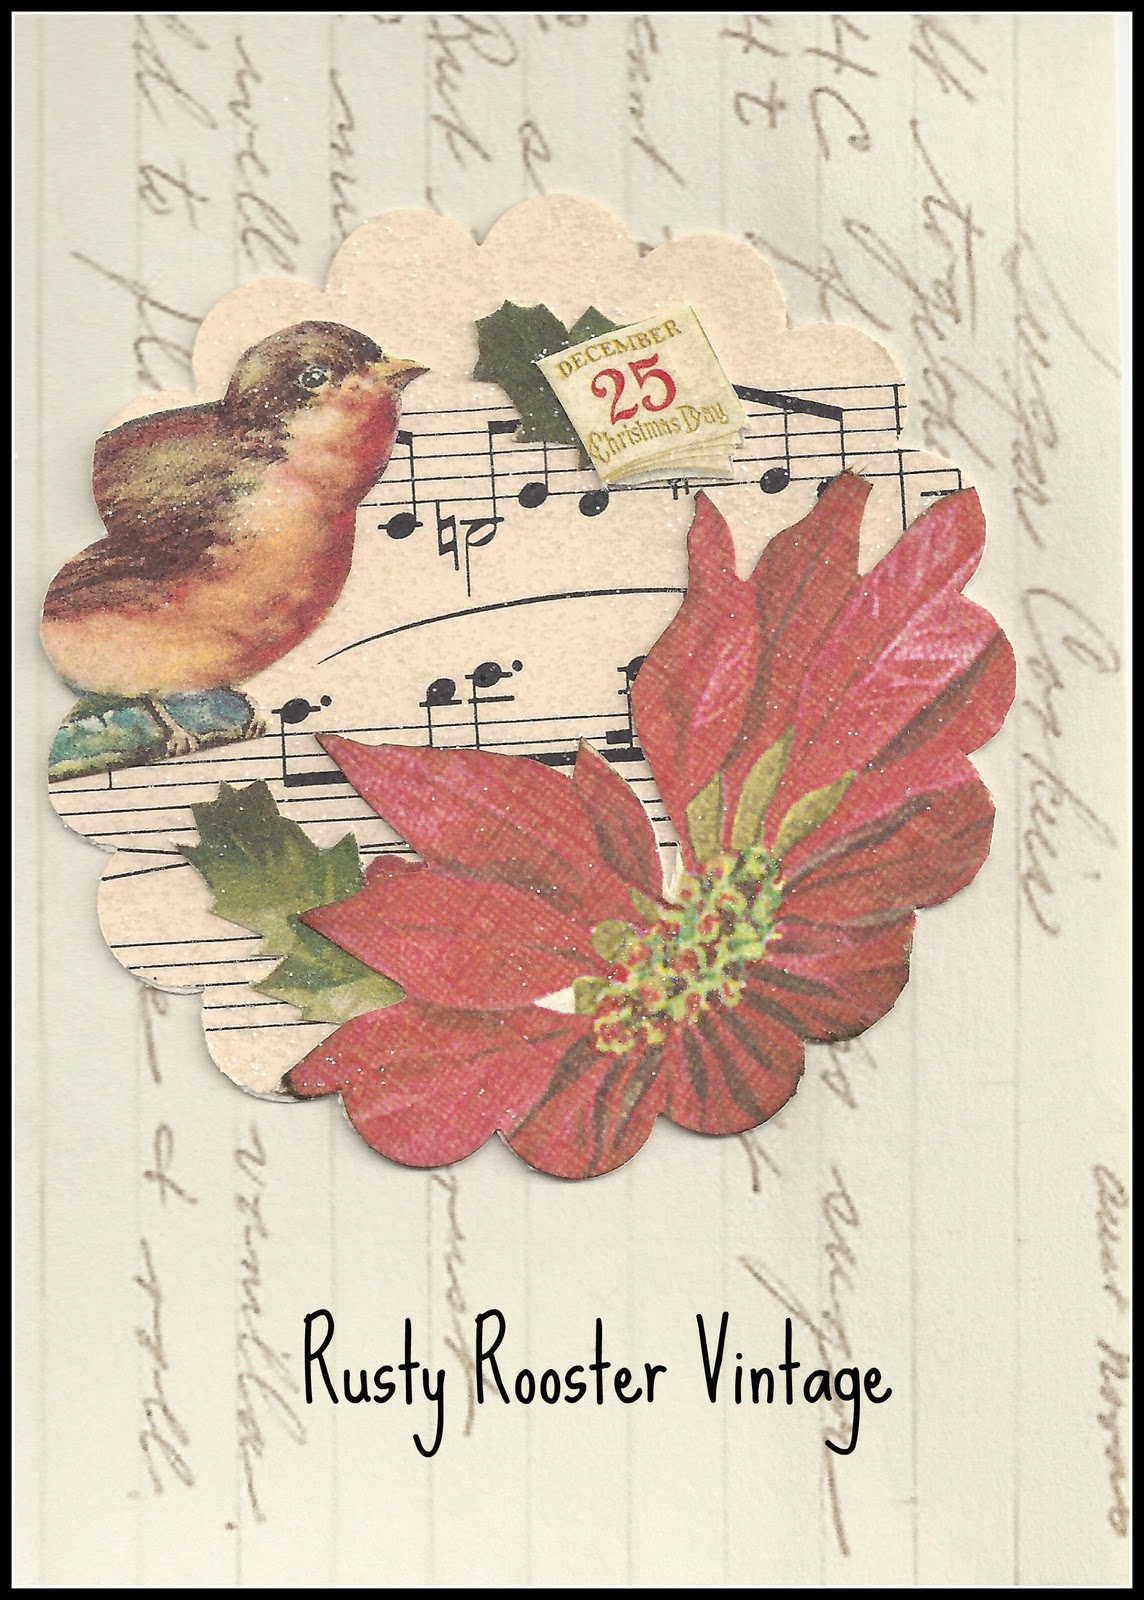
I simply cut a 3 inch scallop from my sheet music and a piece of cardstock. I mounted the sheet music on the cardstock for support. My clear plastic ornament had rounded edges. I chose to use the scallop punch to give my ornament a similiar shape to theirs. I then made a small collage using my die cuts and saved digital images. I hand cut each piece and glued in place. Now, my die cuts were too large for the 3 inch scallop so when I was done positioning each piece, I had to cut away the excess. I chose to handcut since my scallop punch is not as sharp as it used to be. When I was done I had this -


What do you think? Simiiar to the PB one?


Use a pencil (eraser end) or small paint brush to help roll down the sides and position the collage where you want it. Then to help the image stay flat and to add some fun texture to the other side, add some decorative excelsior fill (the white moss). Note these are not round ornament bulbs. They are more convex like the back of a spoon. Here she is all done! ...and here's me taking photos in the rain. lol


As an added treat...I'm sharing my collage digital image with you! No need to make your own collage, scan, etc. Just right click this image and save to your computer. In your photo editing software, choose to print this as 3.5 x 5 photo size but on cream cardstock. Either punch out the image or hand cut. You will just need to add a touch of glitter and place inside your clear plastic ornament.
 You can use any vintage image you have on hand too. They don't have to be round to look great floating inside the ornaments. What about black and whites of your family on Christmas morning or the kids sitting on Santa's lap? Don't want to use the originals? Just make copies on cardstock -


So, glad you stopped by on this rainy day! I hope you enjoyed this easy tutorial and the freebie! Your comments and follows are greatly appreciated. I'm altering some vintage finds today to create more ornaments. I'll be sharing those this week too. I'm linking my little white Santas above to White Wednesday at Faded Charm Cottage. I'm also linking to Its so very Cheri and Rednesday . On Friday, I'll be linking to Show and Tell Friday at My Romantic Home. Stop by and be inspired!


These are just wonderful, Vicki! They look so great~ thanks for sharing your image!
ReplyDeleteBrilliant! I have to laugh because I was just in PB this weekend ( talking out loud to myself as the sales person walked by probably afraid to approach the crazy lady) saying "I bet I see these on some blogs soon" and "I bet I can make some of these". Thanks so much for sharing your image too!
ReplyDeleteWow Vicki ..these are Beautiful ...May have to try it out if I get a free moment ...and I find this style ornament ?
ReplyDeleteYou have a fabulous gift of creating and teaching !!!
Blessings ..Sara
Cute, cute, cute. You've done it again!
ReplyDeleteVicki! I love these! I think this may even be something I could do with my oldest kiddo! It would be fun for them to put pics of themselves with Santa inside the ornament and hang it on our "Family" tree that they get to decorate to their heart's content! :-)
ReplyDeleteThanks so much for sharing the great inspiration!
Vanessa
This looks amazing!!!
ReplyDeleteSoooo cute
Jenny
www.simcoestreet.blogspot.com
PS. I'm glad I'm not the only one posting about Christmas :)
Carol, I thought the same thing when I was in PB! I said to myself, these are way too easy. Sara - you can definitely get these at Michaels or Hobby Lobby. Just look at the photo - not bulbs but more convex like a spoon. So glad you guys like these and see how easy you could do this and make it your own with family photos or images. Have fun for $1 a piece!
ReplyDeleteyou clever...clever girl you! will have to try this myself. Wish me luck! They are ever sooooo lovely!
ReplyDeleteGreat idea Vicki. Thanks for sharing.
ReplyDeleteEnjoy your evening.
Vicki that is fantastic, and I was just saying that I needed to come up with ornaments for my clients this year, so thank you, thank you, thank you!!!!
ReplyDeleteThose turned out beautiful!! Very clever and creative!!
ReplyDeleteI love that you're getting back to the basics-homemade-wonderful-I think they always turn out better and we're more proud of them for making them!!!!
ReplyDeleteI love this post! I adore PB too but they're too pricey for me these days so I greatly appreciate your wonderful DIY project and tutorial. So charming!
ReplyDeleteHappy Rednesday,
Sally
The ornaments are so sweet!!!! And thank you so much for the tutorial :)
ReplyDeleteI am new to blogging and see that you are from the same area that I am!!! We did have a terrible rain today didn't we?
Thanks so much for sharing!
Suzann
I love these--they are gorgeous!!! I saw something similar the other day that I was going to make...but yours are way more intricate--they are perfect!!! I saw a blog the other day and thought of you...I thought I could find it and send you over there, but when I went to the post, it was gone...If I find it, I will definitely let you know because she had stuff I know you'd be crazy about! Your bulbs are fantastic!!!
ReplyDeleteXO
...you are a smartie pants!...so great...and I love Robins!
ReplyDeleteThey turned out beautiful. Thanks for sharing.
ReplyDeleteAnnette
Hello Vicki! Wow you are right around the corner from me! Thanks for stopping by and leaving a comment and becoming a follower. I am following you now as well. Not selling here right now but usually make an appearence at Renninngers during extravo time. Email me sometime.
ReplyDeleteHugs,
Shelley
That is such a great idea! Simple yet elegant! (And I just donated a bunch of those clear ornaments, too - rats!)
ReplyDeleteAren't you the crafty one....stunning!
ReplyDeletebunny
WONderful!!! I was in a PB (rare!) friday and fell for these pillows with Amaryllis on them...couldn't afford...I will wait for your re-create! Tap, tap,tap
ReplyDeleteVicki...you TOTALLY improved on the PB ornament. I love yours!! So pretty.
ReplyDeleteBlessings!
Gail
Hi Vicki, Your ornaments look gorgeous, you did a great job! Thanks so much for sharing!!! I wanted to thank you for stopping by and for your sweet comments, I loved reading them... Blessings~~ Daphne
ReplyDeleteI think yours look better the PB. What a great tutorial-can't wait to try these. I love the vintage style and the creativity you can use! Thanks!
ReplyDeletewow! what great "knock offs"!!!! Fab job... thanks for sharing:)
ReplyDeleteta da!!!! they are beautiful!!!
ReplyDeleteI like yours even better! PB has so many great things, but they're way out of my price range. I love it when someone like you comes along and expands on PB's ideas and makes something really incredible!
ReplyDeleteHappy REDnesday!
Carol
Adorable ~ think of how many you could make for their price of 4.... Thanks for Sharing!
ReplyDeleteThose are so cute. And so much better than $29.00. Thanks for the tutorial and image!
ReplyDeleteHi Vicki,
ReplyDeleteToday I was a curator on Etsy for a treasury and I was going to add your bulbs until I realized that your Etsy store isn't up and running yet...How funny is that? Well, when I make another one, your items will be in it once you're on...Hope you're having a great day!!
XO
Cindy I am so happy that you considered these for your treasury. Yes, I have not listed in my Etsy shop yet. I participate in an annual holiday homemade open house in November. So, I'm still busy making and getting ready for next weekend! I'll have more time for Etsy then. Several of you have asked. THANK YOU!
ReplyDeleteHi Vicki,
ReplyDeleteThanks so much for leaving a comment!!! I hope it works..lol
Wow, the homemade holiday open house sounds amazing...how fun!!!
And don't worry...whenever you open yours, I'll put you in and that will be exciting!!!
XO
I love your clever version, and it must feel great to save some money in the process.
ReplyDeleteWow, those look great, better than the PB ones! Thanks for sharing you instructions too!
ReplyDeleteWOW.....you did an amazing job..I thought they were store bought..You ROCK with talent!
ReplyDeleteVicki...you stood out in the rain just for us????
ReplyDeleteYou are the BEST! hahaha
Girl, I love this and yes...I'm stealing a copy and YES I'm making some for my tree and YES YES YES I thank you for all of your tips and treats!!!!!!
HAVE I TOLD YOU LATELY HOW FABULOUS YOU ARE????
.
.
.
YOU
.
.
ARE
.
.
FABULOUS
.
.
GIRLIE!!!!!
:)
Way to go Vicki! They look gorgeous! I used to get the catalog just for ideas... I think they caught on to the fact that I never buy anything from them! Yours are wonderful, Theresa xoxo
ReplyDeleteFabulous! I may just have to give this a try myself. Thanks for the freebie image.
ReplyDeleteOh my gosh, your ornaments are gorgeous! Thanks so much for sharing! Watch out Pottery Barn!:)
ReplyDeleteThese are awesome Vicki! What a clever idea to use the excelsior fill. Can't wait to see them in person!
ReplyDeleteWow, I am so happy Brenda sent me over. What a wonderful job you did. I had seen them in Pottery Barn and I like yours better. Glad to find your blog.
ReplyDeleteThose are gorgeous! WTG...great tutorial!
ReplyDeleteRoselle
very creative of you! turns out beautiful project! am sure your xmas tree looks great when time comes!
ReplyDeleteOH MY GOSH!!! You are a genious. Love it!!! You could easily sell these beauties and make some $$$$$. *hugs*
ReplyDeleteYou totally impressed me Girl! Lookin' good for sure.
ReplyDelete~~Ahrisha~~
cute cute cute!!!
ReplyDeleteI'm home. trying to catch up on blogs, housework (left it a mess) bookwork, setting up Christmas at the store..... and so on.
also have some new ideas for collages. cannot wait to do those.
I'll be back to visit later.
hugs and blessings
bj
Once you have done this, set the burn speed to 4x and click Burn and
ReplyDeletewait for it to complete. It combines RPG elements and strategy for a very interesting game where you must stop the
rows of pirates ship from making their way down the river.
If you want to be able to hit the ball further and harder,
you should keep in mind to keep your grip on
the bat loose, your swing should begin with your legs
and hips, and finally, you must always follow
your bat through.
Also visit my web-site www.artichoke.uk.Com
The fishfinder approximates where the fish are by measuring the amount of time between when the beam
ReplyDeletewas sent out and when it registered the hit. Sea fishing can take place from a boat,
from a pier or jetty or from the beach or by an estuary.
One can find another 2 options as to wholesale fishing rod,
which might be hollow-tip rods and reels and spliced-tip
rods.
Review my web-site; http://www.bobhurleyford.com/map-a-hours/community-news/entry/ford-yahoo-launch-focus-electric-online-with-u2018plugged-inu2019-u2013-yahoou2019s-first-reality-competition-series
a Bruce Lee workout includes stretching, bending, running,
ReplyDeletedipping, kicking, jumping, traditional muscle building exercises, weight lifting, rope skipping, medicine ball handling,
etc. Vinson had participants keep their normal diet and exercise routines
(or lack thereof) and merely added the green coffee.
Who does not need that little bit of elevation when trying to
diet.
My homepage - Http://www.5-10kgabnehmen.de
No longer does a music lover need to bother about traveling out of range when
ReplyDeletea fantastic song comes on over the vehicle radio. This means that everyone in
the whole wide world can access this new kind
of radio and you are assured that the programs as well as the
list of radio stations you are listening to are all automatically updated.
Another radio commercial production tip to chew on is to make sure the audio
quality is excellent on any spot your produce.
my weblog radio controlled watches review
The internet is fueling the success of music because it can be listened to
ReplyDeleteat any time of the day and anywhere in the world.
It was an entertaining radio program that played the music people
wanted to hear combined with his groovy upbeat personality.
Many people will be happy with replaceable batteries for home use and occasional outings.
My homepage :: radio pink listen
But with Nexus Radio the only settings you have to worry about
ReplyDeleteare where you want to save your files and what file type you
want to save it as. Next, build a list of prospects and develop a relationship with those prospects on your list.
What s more is that 2G phones can come in a tinier and slimmer package, even its batteries.
Also visit my website; Radiohorizontefm hotmail misiones
For any kind of luxury item of consumption, MAD (Money, Authority and Desire) is
ReplyDeleterequired. And once you have your own project that you want to promote,
you must have considered the radio as one
of the best alternatives to introduce your music to
the crowds. What s more is that 2G phones can come in a tinier and slimmer package,
even its batteries.
My weblog: radio broadcasting books
No longer does a music lover need to bother about traveling
ReplyDeleteout of range when a fantastic song comes on over the vehicle radio.
This means that everyone in the whole wide world can access this new kind of radio and you are assured that the programs as well as the list of
radio stations you are listening to are all automatically updated.
Yours Truly, Johnny Dollar: The Duke Red Matter (Part One; CBS,
1956)'Abbott Stables's Duke Red is a thoroughbred destroyed
over a serious injury in an accident, and Dollar (Bob Bailey)'asked to review a $65,000 insurance claim on the horse'smells trouble when the stable's business manager is dismissed after filing the claim, and its veterinarian may have destroyed the horse a little too swiftly.
Feel free to surf to my blog post 2 way radio uhf
Have you thought about using 2.75" clear epoxy stickers instead of the ornaments? I found some on Amazon (sold by the Bottle Cap Company). You could cut a 3" scalloped cicle out of silver glitter paper, punch a 2.75" circle out of your design, and adhere the epoxy sticker on top. Finish with extra glitter. Also, you might consider decorating front and back... perhaps two coordinating designs with a ribbon to hang (which you could connect in-between the two sides)? Thoughts?
ReplyDeleteAre the clear plastic ornaments you use in half size? I don't understand how you glued the clear plastic to the graphic. I tried this and it did not stay on b/c there is no lip on the edge of the plastic to help it glue. How did you keep it glued to your paper graphic? Thanks.......love these btw
ReplyDelete