Showing posts with label altered. Show all posts

Sunday, January 29, 2012

Be my Valentine? A little giveaway...

Hello, friends.  I had some fun this weekend painting tin molds and altering them into little Valentine treat baskets.  This one was painted cadmium red on the outside and antique white inside. The edges were glued and dipped in German glass glitter. I punch two small holes with a nail and ran some wire through for a whimsical handle.  The ends were just wrapped around a small pencil and trimmed.  The best part though was filling it with goodies from my stash.  I'd love to share this little Valentine with one of you....who knows, maybe I'll even make another one filled with surprises and give away two!  After all...
I have one more left and the husband says this is WAY too small for the bag of peanut butter M&Ms he's hoping for. Maybe I should alter a pie plate or loaf pan for him to hold all that chocolate? lol  Leave me a comment below to enter this little giveaway. If you don't have a blog, please leave me your email so that I can contact you if you should win!  I will announce the winners next Sunday. Hope you had a great weekend! xoxo

Monday, July 18, 2011

Project on the table

Hello, friends!  I worked on several projects this past weekend including this altered cross.  I had some fun making this distressed lace.  Here's a closer look -
I love leaving the strings long and adding this texture.  The cross was painted with my faux rust technique.
I'm still deciding how to finish her off.  Here's an idea I'm considering that uses a few found objects -

What's on your work table this week? I would love to hear. I'm also working on a red project for Kristin's Summer of Color Challenge.   I'll share that finished project with you tomorrow.  If you get a chance pop over to Kristin's to see some great mixed media art that bloggers have shared this summer.  Her blog is full of inspiration.  xoxo

Tuesday, July 5, 2011

Bird fabric collage "Home Sweet Home"

I spent the past few nights making this fabric collage.  I had many sources of inspiration. My best girls had an itch to get together this weekend and create from cigar boxes. I decided to use just the lid. I applied my rust technique found here.  I had also been inspired to play with heavily distressed fabrics after visiting Joanna Pierotti's blog.  You really should take a look at her gallery.  Finally, I had seen Karla's "Faux Vintage Photo" spotlight in the latest issue of Somerset Studio Gallery.  Karla taught us how to use wax paper over an image to give it an aged appearance. Love this technique!

Look for more collages from me in the new shop. Yes, I am finally starting to list a few pieces over at -


It will be a slow process but I've finally taken the plunge. Give that button a click and check her out. I appreciate your follows over there!  I have added email feed so that you will be notified if a new item is listed. Thank you for all of your support! xoxo Linking up to:


vif187


Wednesday, June 15, 2011

Chippy shabby window photo display

Hello, friends! Here is another photo display from my mother in law's 80th birthday.  I used my shabby old window to display wedding pictures of Jean and Frank. They have been married 55 years this year.  I hung each photo with a torn piece of vintage book page as a matte.

And where did that rusty letter "M" end up?  It stands proudly on top of this display. I like the contrast.
Feel free to double click and enlarge the picture. Happy White Wednesday to all!  I'll share my redo of my PB wall cubby with you next.  I had some fun using that to display pics for the party too!  Hope you are having a great week.  xoxo  I'm linking to the following parties! Come join the fun!
Photobucket


Tuesday, June 7, 2011

Altered cabinet cards

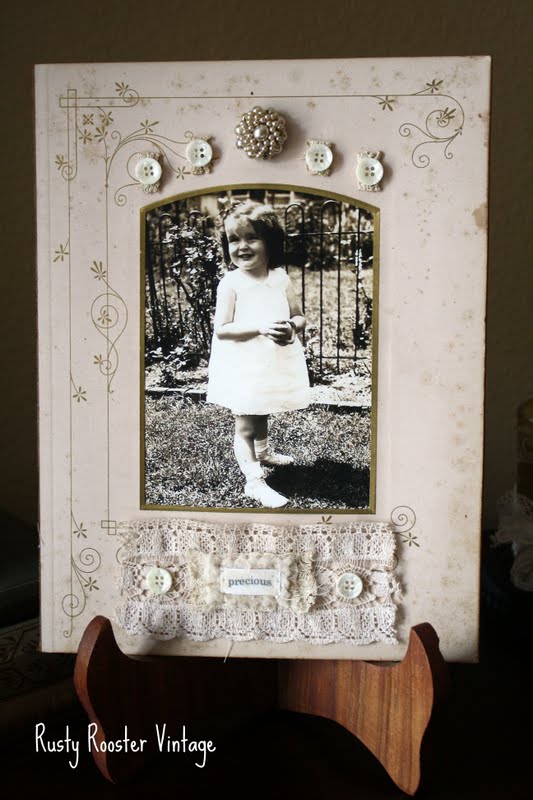
Happy White Wednesday! I'm working on some creative ways to display family photos this week. We are hosting a party Saturday for my mother in law, Jean, who will be turning 80 years old.  I want to place photos around the house of Jean at various ages and stages of her life.  The entry table will focus on her childhood. I have several very good black and white photos and two tables to use. Today I altered two cabinet cards with photos of Jean as a little girl.  These cabinet cards will be the focal point of each entry table.
 
 I wanted to keep the embellishments neutral so that the picture remained the focal point. I was just adding texture. Vintage lace and mother of pearl buttons seemed perfect for this 1930's picture. Here's another shot that I love of her standing in the garden.

I used this wooden frame display just for these shots. I won't be using it for the actual party. I will have some fun photo holders for the other black and whites that will join the cabinet cards in the displays. I'll share those ideas with you as I decorate this week so stay tuned!  I hope you are having a great week.  I'm linking this to -

Thursday, May 26, 2011

Nest for a friend

I finished one of my nests on a spool.  I've decided to mail this one as a surprise to a sweet friend.  I kept it simple. I did not want to take away from the beauty and texture of the nest.  I wrapped a bit of paper around the spool then added some waxy flax and a vintage button.  Here's a close up of the nest on this one -
If you missed my post on how to make these, go here.   It is a fun project and you probably already  have the materials to make these.
I embellished a store bought card (love the Michael's $1 section for this) for her too.  I love to add a personal touch to these pre-made cards.  You could also use your own scrap cardstock to make cards.  Pull out your bits of lace and paper, do a little stitching or just use glue, maybe even add a rubber stamp image...add your special touch.  I could spend hours making these. Sometimes I do!  It is great to have a stash on hand. The extra touches on these make them so much more fun to give.

I hope everyone has a safe Memorial Day weekend.  We are staying close to home, and I plan to do a little creating.  What about you? Any big plans?  Linking up to:

vif187


Monday, May 9, 2011

Tutorial - Making bird's nests

Some of my best days creating are the ones I didn't plan. No project idea in my head that I'm painstakingly trying to recreate on the project table with what I have on hand. No expectations or deadlines.  It is all about being spontaneous. Something just inspires me, and I sit down and start creating.  Last week, Kara (my daughter) and Sydney (her BFF) were making birds out of clay at the dining room table. I sat down to check things out. I decided the birds needed a nest, so I began to play too....
I had some wooden spools on hand. They seemed the perfect size and proportion for the birds being made. They would make great little stands for my nests and bring in the wooden element of a tree.  Next, I grabbed some 30 gauge floral wire. I wanted to be able to bend and mold the nest as I was constructing it. Anything similar will work. I actually wrapped it around two of my fingers. I started with a tight wrap and released the tension each time I wrapped around to get the bowl shape you see here. I added a heavy dollop of EX6000 (EDIT: This is a craft glue found at Michael's. Holds heavy embellishments and great for metal) to the top of my spool and placed the nest on top, holding it a minute or so until it set. Time to pull out your floral moss and grass.
I started by adding EX6000 again to the center of the nest on the spool. I then placed a clump of green grass to the top center and held it until set. I then added glue directly to the spool again but this time around the top edges. I added small bits of green grass here to the outside edges to help cover the wire. Now, don't worry about all the excess.  You will trim that later. Be sure not to trim it perfectly.  For a realistic nest, leave long pieces here and there. Create texture with different lengths.
Adding some moss will really make your nest realistic! I added EX6000 all around the outside edges of the nest (wire) this time and added clumps of green moss.  I also added moss in the center of the nest.  I used my fingers to mold the shape. Again, I trimmed the edges at different lengths to create texture.
Now we just need to finish our birds and welcome them home!  I plan to dress up the spools a bit too. This is a work in progress. I wanted to share the nest tutorial though. It was so easy to do and can be recreated on a much larger scale.  How about you? What is on your project table this week? Have you taken any time to play lately? Tell us about it.  Until next time...xoxo

Thursday, May 5, 2011

Gifts from friends

Hello everyone! I had a little birthday last month and my dear, sweet, vintage loving, mixed media art making friends Jodi, Kelley and Kim (girls I put you in ABC order...lol) each gave me something special to mark the day.  These girls really know me. Whether it is sharing a special find or making a handmade treasure, it makes me feel like a kid again when we exchange gifts.  This adorable tag above was made by Kim.  With it was this little cutie-
I had seen this on Etsy. Kim hijacked my favorites and found it. Thanks, Kim! I love it and looks great in the kitchen.
This beauty came from Kelley. Kelley and I have a mutual blog friend, Petite Michelle Louise.  We both love Michelle's blog and her fantastic Etsy shop!  One of my favorite finds in the shop would be Michelle's altered door knobs. Kelley got me one! Isn't this perfection?!

How about these two darling gifts? They are from Jodi and her daughter Sydney (Kara's BFF).  I can't stand how cute this little bucket is on my back porch. This hen pin cushion was a real surprise. Sydney also got me a gift. Makes my heart melt that she found this and thought of me. 

I had another sweet surprise in the mail. I fun filled package of little paper pieces, hat pins and organza bags from sweet June at Lina Beas.  June, I have already used half the envelope for teacher appreciation week! I dug in right away. THANK YOU!  Guess what? June has a giveaway here if you'd like to stop by and enter.  Take a look -

Life is better with friends at your side.  So glad to call these girls and each of you who visit, my friends. Hope you are having a great week and a safe weekend. Thanks so much for stopping by!
Related Posts Plugin for WordPress, Blogger...