Friday, November 18, 2011

Altered bottle brush tree project

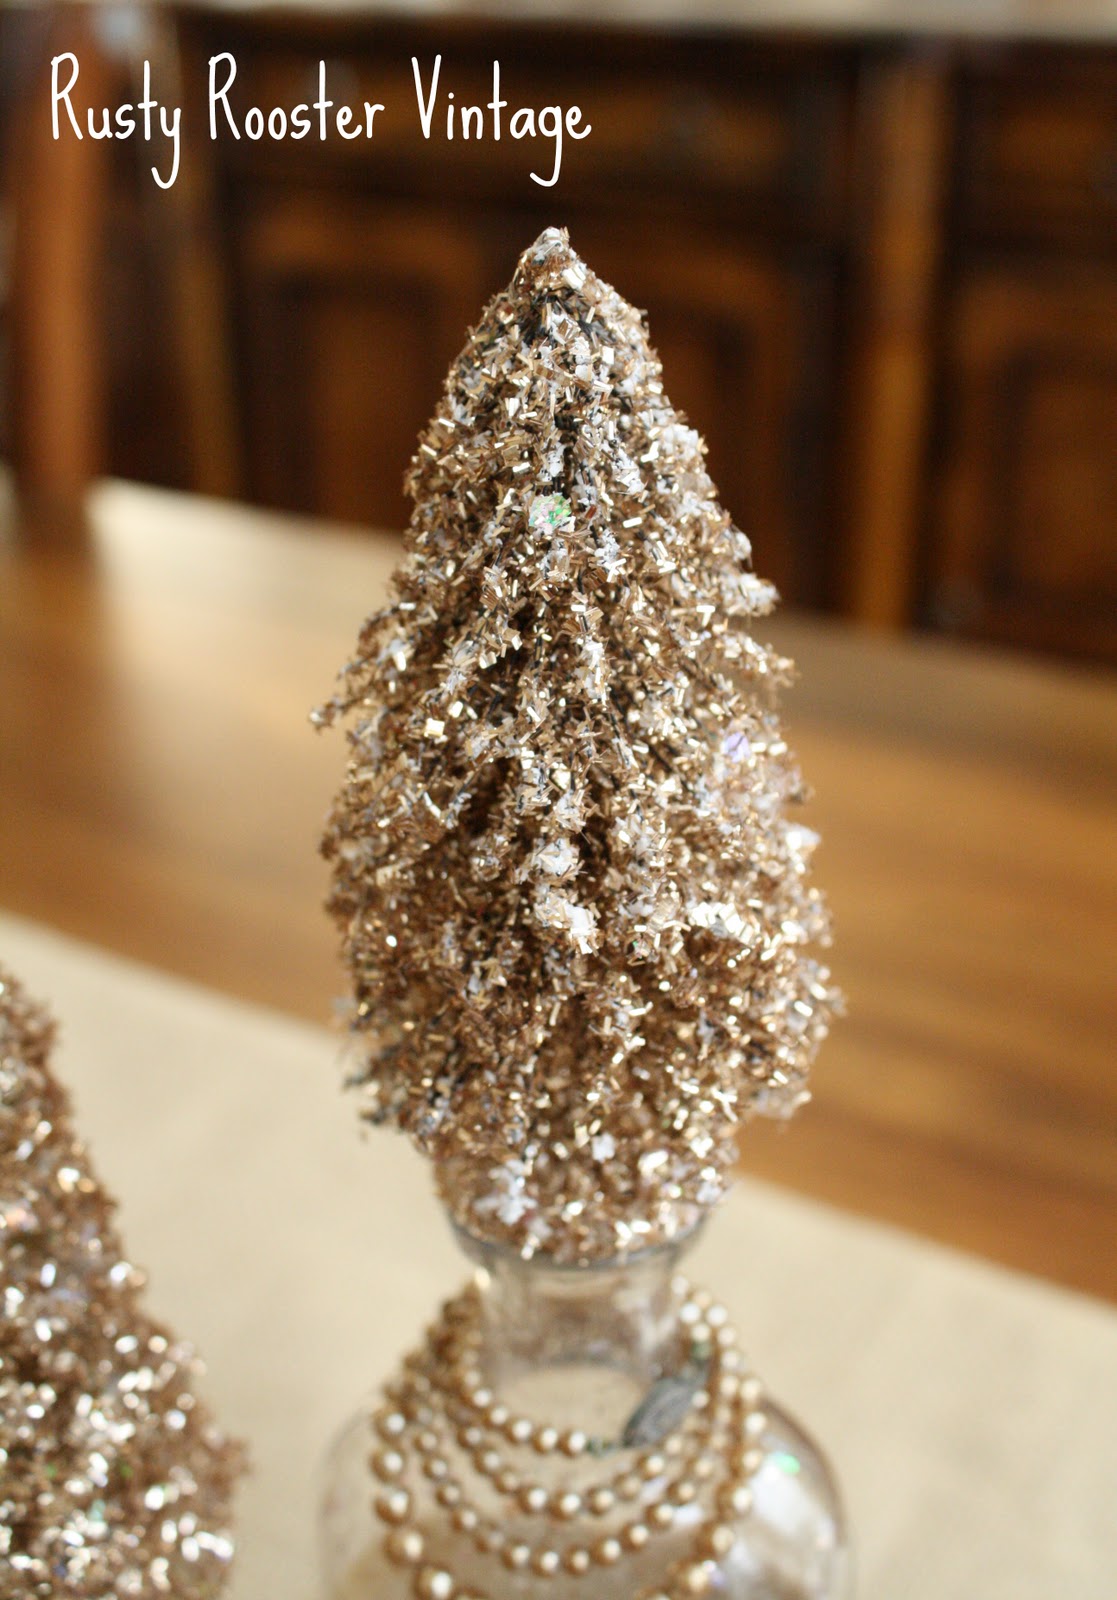
Hello!  I'm finally posting the altered Xmas bottles my friend Jodi and I made last weekend.  These are simple to make and so pretty. I love the way they turned out.
 
Here's what you need to make yours: 
Old bottle(thrift store)
Bottle brush tree (craft store)
Bag of faux snow 
Champagne or gold tinsel glitter
E-6000 glue
Liquitex matte gel medium
Fabric scraps 
Jewelry pieces for decorating
Jodi came up with a great concoction for decorating the bottle brush trees.  She mixed faux snow from Michael's with champagne tinsel glitter in a bowl.  This really helps stretch the glitter and gives it more texture.  We bleached bottle brush trees from the craft store.  Removing the green makes them easier to cover.  We then applied spray adhesive to the dried trees and sprinkled our mixture onto the tree until covered.  It did take a few layers.  Tip: Create two stations. A spray station in a box or over newspaper then a second station where you apply glitter mix. I put newspaper down and used a plastic bowl to mix and apply glitter.
 I think this is an inexpensive alternative to using all your fine German glass glitter.  I really like how easily it covered and the texture it creates. We glued the trees onto the bottles with E-6000.
The bottles were finished off by wrapping them in fabric scraps. I used gel medium to adhere the fabric to the bottle. It dries clear.  The coordinating jewelry pieces were attached with more E-6000.  The large bottle has a strand of pearls hanging about the neck.  These will definitely be part of my Christmas decor this year!  Hope you had a great week.  More Christmas projects on the way!


Tuesday, November 15, 2011

Great Day in the Country

It sure was a Great Day in the Country!  Saturday was our town's annual craft fair. The weather could not have been better. It was a cool 50 degrees to start out and warmed up to the mid 70's.  There was not a cloud in the sky. 
Kara and I got an early start. We were inside the fair before the 9:00 start so we could get in line at our favorite booth - Tuckers.  The owner always seems to have something great with rusty old wheels. They sell out quick. This year we were lucky enough to score this adorable barrel above. I plan to use it by the front door and put a Charlie Brown Christmas tree inside.  Like her?  They also had these great wagons. I grabbed a few for my friends who were still parking.
Here are a few more Christmas goodies from this great booth.  I love this altered skate and suitcase below.
These signs are really cute too. Made from old cabinet doors.  Some still had the latches.  Hard to take pics with so many people trying to grab the merchandise!

Just like in blogland, there were tons of fabric pumpkins to choose from at the fair.  Here are a few that I found interesting and thought might inspire you.


How about this gorgeous three dimensional stained glass with vintage glassware built in?  Amazing and just gorgeous out there in the sun. 

We always have to stop and visit the local honey vendor.  Kids love the honey sticks. This booth is a favorite at our farmer's market too.

Found some good Christmas gifts at this next booth. Too crowded for pictures but managed a few!


I hope you enjoyed coming along.  This weekend is Renningers.  I need to replenish some supplies. I always find great bottles, books and jewelry pieces at this antique fair.  I'll be sure to take you along again.  Christmas craft coming next.  Get ready to alter some bottle brush trees and bottles!

Monday, November 14, 2011

Heart you

Kara found this rock on a recent trip to the beach.  Don't you love it?  Just wanted to share this picture and take the opportunity to thank each of you who visit me, follow me and leave such wonderful comments...I <3 (heart, love) blogging and all the friends I've made here. Some fun posts coming this week. Hope to see you back here for Christmas projects and Great Day in the Country pictures.  Have a great week!

Friday, November 11, 2011

Holiday Open House Part 2

Hello, friends! Here are the rest of the pics from Hidden Treasure's open house.  This is our local antique store. Check out this assemblage Santa.  Lots of old goodies used to create this guy.  Here's a close up -
Here's another Santa for you.  I thought these were really neat. I didn't check the price.  Probably best!
The store was crowded but I managed to snap a few more photos of things that caught my eye. 

Tomorrow morning  I'm headed to my town's annual craft fair , "A Great Day in the Country." Don't worry! I'm taking you along too.  I'll have my camera in hand. I was hoping to hit the Fancy Flea Market sale in Lakeland, Florida tomorrow afternoon. It's a good one!  But, my son has an important basketball game at noon that this mom just can't miss.  Wish us luck!  Have a great weekend and thanks so much for stopping by!

Tuesday, November 8, 2011

Magnolia Leaf Display

I've been looking for something to put in my cute little window for Fall.  Our magnolia leaf art, from my last post, fits perfectly.  I decided to put a vintage book page behind each leaf. What do you think? Any other suggestions? Maybe a white book page instead?  I also added a small branch to my letter "M."  I would love to add a few more branches.
If you want to take a closer look, visit here.  I suggested using these for a banner or perhaps framing a few. You guys had the great idea to use them as Thanksgiving place cards.  I also had a few questions about whether I used dried leaves or fresh from the tree.  I picked leaves off the ground for this project, although the colors on the fresh leaves are so pretty.  I was worried they might change shape as they dried, so I tried to pick ones that had already started to dry and appeared mostly flat. The magnolia leaves are super thick and waxy.  These held up extremely well with the machine sewing.  Here in Florida, we have high humidity and are not running our heat.  These should be fine through Thanksgiving. I made some suggestions on my previous post on how to preserve them with gel medium. Maybe I'll run a test for us!

I hope you are having a great week!  More pics of the Hidden Treasures Holiday Open house coming up next.  Thanks for stopping by.

Sunday, November 6, 2011

Magnolia Leaf Art

Kara and I did a really fun project last night with Magnolia leaves. We have two Magnolia trees in our yard.  I am always fascinated by the leaves, which are waxy green on one side and a gorgeous rust on the other.  The color inspired this Fall project.  At first, we considered painting and stamping on the leaves. I had seen others do this with their fall foliage.  But, as we sat in the studio surrounded by my fabric scraps, we came up with our own idea.  Here are a few of Kara's leaves -
These are simple to make.  Gather the leaves from your yard.  The first thing we did was to add some machine stitching around the edge of each leaf.  Then, we printed some words onto cream colored card stock.  Kara cut out the words and distressed the edges with brown ink.  The words could have easily been printed on fabric too. Then, just layer your scraps and add the word using gel medium that dries clear.  On the leaf above, Kara sewed on her fabric scraps then glued on her word.
We added a touch of clear gel medium in spots and sprinkled on some glitter too! Just tap off the excess.
Here are the close ups of my altered leaves.  I have the perfect spot for all six of theses and can't wait to show you this week!
We really enjoyed making these. If you don't have a sewing machine use a white ink pen, stamps or paint to doodle stitches instead. You can certainly use paper instead of fabric too.  Just make sure you use glue that dries clear.  EDIT:  A few of you have asked about preserving the leaf before you start. I imagine you could use the clear matte gel medium (Michael's) all over the leaf before you start.. Just let dry before you sew. Magnolia leaves are very thick and waxy. They were very easy to sew. I was making a seasonal project and was not too concerned about preserving these permanently. I used the leaves that had just fallen from our tree.  I did play with a fresh leaf too. It gave off a yummy smell and turned my thread green! lol

I have the perfect place to hang these six little creations (stay tuned!), but I also suggest you consider framing them or making a banner out of these.  For a banner, you could easily wrap the stems in wire or jute or glue small pieces of straw on the back and run your ribbon through for your banner. Get creative! Thanks for stopping by my friends.  I appreciate your comments and follows so much. xoxo

Giveaway news! Go visit Lynn today!

Most of you know Lynn Stevens of Trash to Treasure Art.  I love Lynn's mixed media work.  She has a great giveaway going on right now so head over to join in the fun.  This beautiful journal above is just one of several gorgeous handmade items up for grabs!  Make sure that if you don't have a blog that you include your name and email in your comment.  Tell Lynn that I sent you! Happy Sunday!


Related Posts Plugin for WordPress, Blogger...